Section 6 - Adding Nodes
This section will take you step by step through the adding of nodes (devices) to your Mutiny system.
6.1. Default discovery settings
6.1.1. Click on the Manager option under the Nodes Menu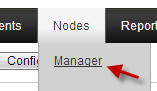
6.1.2. Click the  button from the top navigation bar
This panel displays a list of Community Strings that Mutiny can apply to nodes during discovery. 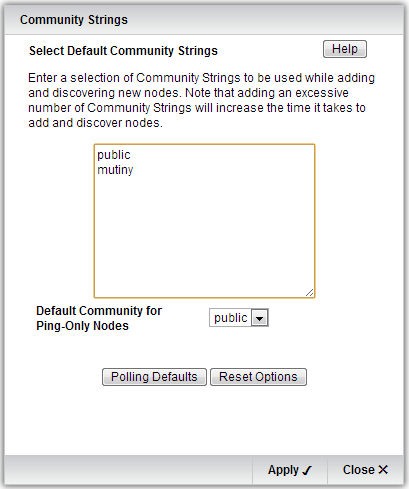
If you are using more than 1 community string in your estate then list them here. There is no specific limit on the number that can be entered, but you should note that entering a large number of communities will slow down the discovery process.
It is important to note that community strings are case-sensitive.
Note also that the community string "public" is often used as a default on printers and some makes of managed switch.
Default Community for Ping-Only Nodes
Use this drop-down list to select the community string to be set when Mutiny discovers and adds a node that does not (initially) respond to SNMP.
This community string will also be used as the default in the Test Node panel.

Establishes the default configuration template of the polling procedure for new nodes.
Node Polling Activates or deactivates all polling to the node.
Ping Polling Activates or deactivates ICMP "ping" polling.
SNMP Polling Determines the polling criterion for SNMP polling.
SNMP Agent Allows the selection of the node's SNMP agent.
Port Number Determines which of the node's ports is relaying SNMP information.
Community String Allows the assignment of the read-only "password" to access the node's SNMP information.
Retries Sets the maximum number of SNMP retries in which to obtain a positive response before the SNMP agent is considered to be "down".
System Polling Determines the polling criterion for extracting the node's SIG SNMP information.
Port Number Determines which of the node's ports is relaying SNMP SIG information.
Community String Allows the assignment of the read-only "password" to access the node's SNMP SIG information.
Retries Sets the maximum number of SNMP retries in which to obtain a positive response before setting the system properties to "unknown".
Node Event Alerts Enables or disables all alert notification action when an Event occurs.

Establishes the options to be used when pressing the  button at the bottom of the Configure panel or choosing the "Reset Polling" option in the Update Nodes panel.
The "Reset Polling" feature is used to re-read a node's SNMP information and reset some or all of the polling properties back to their default values (i.e. the values set when the node was first added or discovered).
It is also used to turn on new node-specific monitoring features that may be included in a new version of Mutiny. For this reason it is desirable to execute an "[Update Nodes]" with the "Reset Polling" option selected, on all nodes following an update to a new version of the Mutiny software.
The problem, however, is that you may not want to alter some or all the monitored properties. In particular you may not want to change the Warning and Critical thresholds, if you have already set values that are working correctly for you. By selecting the right combination of options in this panel, you avoid this happening.
Node Name
Choose "SysName" to set the node name to the SNMP system name. Choose "IP Address" to set the node name to be the IP address. Selecting "Off" (recommended) leaves the node name unchanged.
Node Icon
Choose "On" to set the node icon to the default for this type of node. Choose "Only if Misc." (recommended), to set the node icon to the default type for this node, only if the icon is currently set to "Miscellaneous". Selecting "Off" leaves the node icon unchanged.
CPU Polling
Choose "On" to reset the CPU Warning and Critical thresholds to default values. Selecting "Off" leaves the thresholds unchanged.
Memory Polling
Choose "On" to reset the Memory Warning and Critical thresholds to default values. Selecting "Off" leaves the thresholds unchanged.
Disks Polling
Choose "On" to discover new (currently unmonitored) disks and set all the disk Warning and Critical thresholds to default values. Choose "Add New Only" (recommended), to discover new (unmonitored) disks and set the disk Warning and Critical thresholds only for these new disks (thresholds for the disks that are currently being monitored will not be changed). Selecting "Off" leaves disks polling unchanged.
Processes Polling
Choose "On" to discover and add new (currently unmonitored) processes to those already being monitored. Selecting "Off" leaves the processes monitoring unchanged.
Agents Polling
Choose "On" to discover and add new (currently unmonitored) Agents to those already being monitored. Selecting "Off" leaves the Agents monitoring unchanged.
QoS Polling (only works for certain types of Cisco Router)
Choose "On" to discover and add any new (currently unmonitored) QoS Class Maps to those already being monitored. Selecting "Off" leaves the QoS monitoring unchanged.
ISDN Polling (only works for certain types of Cisco Router)
Choose "On" to discover and add any new (currently unmonitored) ISDN DS1/DS0 interfaces to those already being monitored. Selecting "Off" leaves the ISDN monitoring unchanged.
Properties
Choose "On" (recommended) to re-write the node properties that are displayed by clicking the "[Properties]" button in the node Status panel (includes information such as OS type, node type and serial number etc.). Selecting "Off" leaves the node properties data unchanged.
Adapters
Choose "On" (recommended) to reset the SNMP Adapters for the node (note that the current set of Adapters can be displayed by clicking the "[Adapters]" button near the bottom of Configure panel.). Selecting "Off" leaves the SNMP Adapters unchanged.
Click  to close the panel
6.2. Discovering devices
With the addition of the new Active IPAM module, users may find it more logical to start by configuring their ranges in IPAM first then adding in important devices from the IPAM interface. See our IPAM setup page.
There are a few methods for adding nodes, Discover, which scans for and adds a range of ip addresses, adding a single or list of devices and "Add Trace" which uses traceroute to discover and add all hops to a target node.
Using a combination of these methods, you can achieve a useful topology of your network.
During discovery, Mutiny will use the community strings you added to the default settings panel.
6.3. Adding a device or list of devices
The  button on the right on the screen or from the right-click menu of an existing node will open the "add node" panel. This allows a single or list of ip addresses to be added to the list of nodes. If you right click on an existing node the option appears in the list and adds the node or nodes as a child.
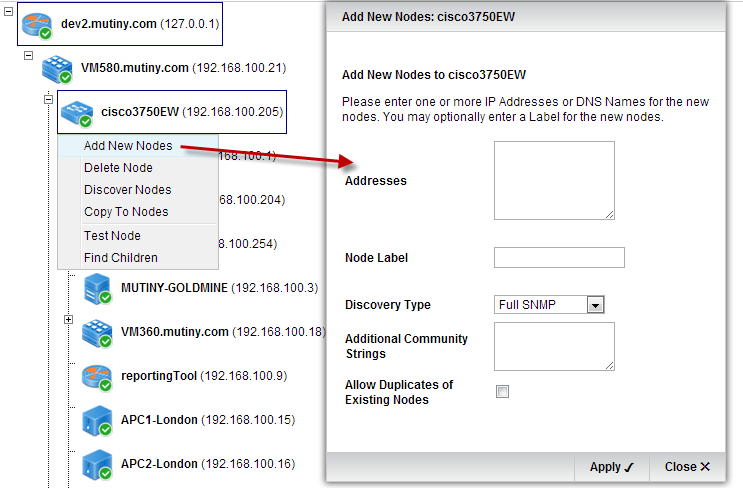
Enter an address or addresses to the top panel and press to start the discovery process. Nodes discovered will be added as children of the node you right clicked on.
The remaining fields are optional. but provide the following functionally.
Node Label Whatever you enter here will be used as the label for a single node or a prefix for a list of nodes.
Discovery Type "Full SNMP" will add all address and all SNMP properties available. "Ping Only" will add all the addresses without adding any SNMP information.
Additional Community Strings In addition to the default community strings you can specify additional strings used for this time only.
6.4. Discover a range of addresses
6.4.1. The  button on the right on the screen or from the right-click menu of an existing node will open the "Discover Nodes" panel.
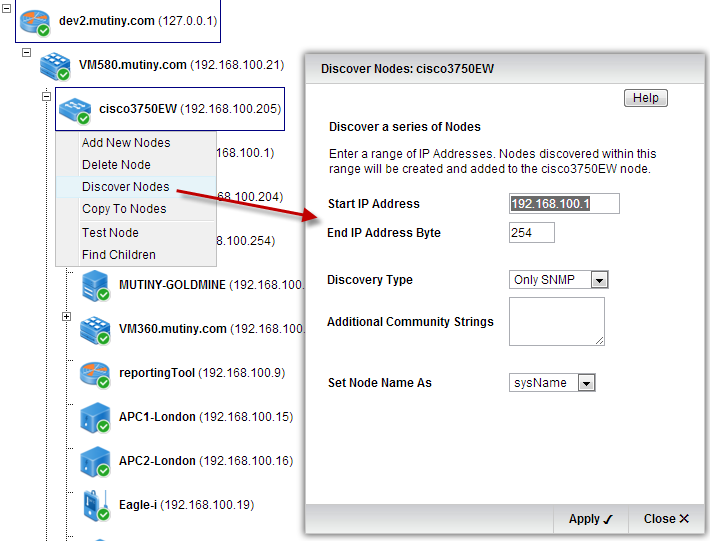
In the "Start IP Address" field, type in the first address of the subnet you intend to discover. i.e. 192.168.100.1
6.4.2. In the "end address" type in the last address of the subnet i.e. 192.168.100.254
6.4.3. Press the  button to start the discovery
During discovery you will see various messages as nodes are discovered and added to Mutiny.
Once complete the message "New nodes have been added" will appear.
6.4.4. Press the button
Wait for up to 1 minute for the screen to refresh and display the newly added nodes. You can also press the Manager menu again to force a refresh.
TIP; you can also type the start address with a CiDR /24 or /23 to widen your search.
6.5. Deleting nodes
To remove nodes from the list of devices being monitored either right-click on the node or press the  button at the top to remove a selected range of nodes.
6.6. Putting new nodes into custom views
Once you have added nodes to the node manager you can group them into your custom views for convenience.
6.6.1. Click on the name of your custom view on the left hand side.
This will open your custom view.
6.6.2. Press the  button to bring up a list of discovered devices.
6.6.3. Using a combination of "SHIFT" and "CTRL" select the nodes you wish to add to this view and press
Once added the nodes will be removed from the list.
6.6.4. Click once you have finished adding your nodes
The nodes can now be dragged to a more aesthetic location in the window. Once you have finished, press the  button to save the icon positions.


